
There is a bit of a spotlight in the film world on smartphone cameras right now.
Among those championing the use of smartphones to make movies are Hollywood directors such a Steven Soderbergh and Zach Snyder, both having shot their recent films with iPhones (in the case of Soderbergh he shot an entire feature film on nothing but an iPhone).
Although, to be honest, we haven’t be overly impressed with the optical quality of these films – the highlights tended to be blown out and shadows too crushed on some of the shots, but the idea still really excited us. To have something that you carry around all day with you in your pocket capable of shooting film quality footage was definitely worth some serious experimenting, so we decided to do just that with our own iPhones.
The first thing you need to be able to shoot more film quality footage on a smartphone is a specialized app that will allow you to alter the settings of the camera to replicate those of a professional one. Filmic Pro is probably one of the most well-known and respected of the dedicated video apps.


With an app like Filmic-Pro you can set your frame rate to 24 (true film captures at 24) and allows you to have manual control over exposure and focusing, with the crucial ability of being able to lock those settings once they are set. Filmic-Pro also has plenty of other incredibly useful controls such as focus peaking, essential tool for more accurate focusing and it also has a histogram feature allowing you to “read” your image and check for potential blown out highlights out or crushed shadows. It also has audio meters. It really does give your phone camera a professional set of tools.
Filmic-Pro also offers (for an extra £10) an add on called “Cinematography kit” – which adds powerful features like Temporal Noise Reduction (for iPhone 7 or above), gamma curve presets and, perhaps most surprising of all, the ability to shoot in LOG format!
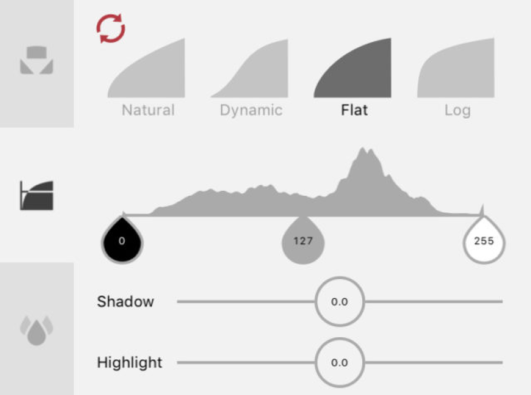
Shooting in LOG is something we’re keen to experiment more with, however we found shooting in “Flat mode” gave us the best results.
We really like how you can manipulate the Gamma Curves to slightly lift the shadows or pull back on the highlights in camera – although of course, it is very limited, it’s still a great tool to help you get the best out of each shot.
There is another app that caught our eye while researching the best ones to use for filmmaking, and that is Mavis-Pro Camera. It’s made by a UK based company and looks to be a real rival to Filmic Pro with one really excellent feature that Filmic-Pro doesn’t have – the ability to Zoom focus, a feature we always find incredibly useful on our DSLR and Blackmagic cameras. If it wasn’t for the Cinematography Kit add on for Filmic Pro, we’d probably have gone for Mavis-Pro because of that feature.
One of the main attractions of Smartphone filmmaking for us, was the greater range of creative freedom it would allow for on a low budget indie film production. On the 7 DAYS shoot, we needed a way to capture a lot of moving shots. So, we went shopping for a Gimbal. We settled on the Zhiyun Smooth Q Gimbal which comes in a really cool looking violin case and under £100.

The moving shots were impressively smooth. It does take a little practice to get the really professionally, buttery smooth shots. But even on your first effort, you should still be able to get some pleasing results which can always be improved using warp stabilizer in AE.

By attaching the gimbal onto the end of a boom pole via a 3/8” to 1/4” thread Adapter, we had a crane. This enabled us to create some really cinematic looking cranes and sweeping movements with the camera, as well as high angle shots that looked like they’d been shot on a drone.
The Zhiyun Assistant App allows you to wireless control the gimbal, which we had set up on another iPhone. This allowed us to control the gimbal when it was up in the air attached to the end of the boom pole.
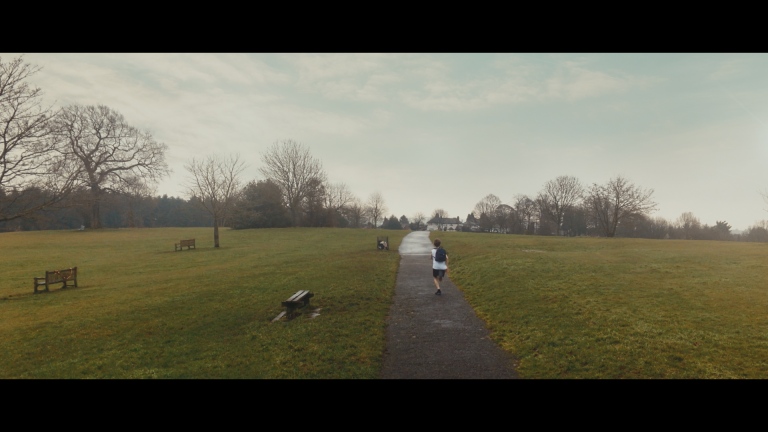
Below is test footage we took using the Filmic Pro, the Zhiyun Smooth Q gimbal and a low cost ZOMEI Vari Nd Filter designed for smartphone photography/filming.
Although we were pretty impressed with the above footage, we did decide to also purchase an additional lens. The lens we opted for was from Moondogs labs, and is, in their words, “a modern lens with a vintage vibe” – which sounded just like the kind of lens we love using.
Another major reason we were interested in this lens is that it is also “anamorphic”, meaning it’s specially designed to shoot in a cinema standard widescreen format. We’ll let Moondogs explain more:
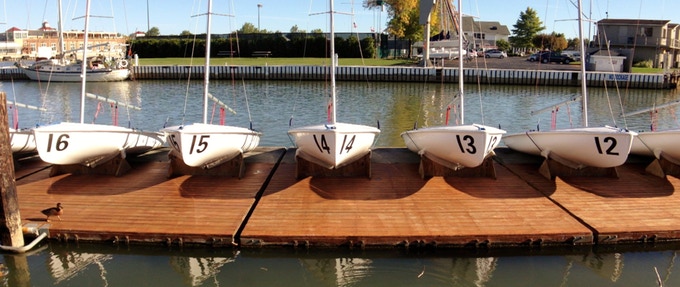
How does the Moondog Labs 1.33x Anamorphic Adapter work? The built-in iPhone camera captures a 16:9 aspect ratio in video mode, like this:

Shooting with the 1.33x Anamorphic Adapter optically “squeezes” a 33% wider scene onto the sensor, creating a raw image that looks like this (note the wider view, but thinner looking objects):

When you restore or “de-squeeze” your video to the proper scaling in software, your final video looks like this:
As noted above, the image captured will need to be “de-squeezed”, and while there are plenty of ways to do that using software (and plenty of tutorials online explaining how to), if you’re using Filmic Pro (or Mavis-Pro) there is a setting you can use that will automatically de-squeeze the image for you when you export the files from your phone.
The lens clamps onto the phone and is built from Anodized Aluminum, so has a nice solid feel to it.


You’ll need an ND filter to shoot outdoors, and Moondog sell ring adapters to allow you to screw on traditional ND filters.
Due to the solid build quality of the lens, it does add a bit of extra weight to your phone, which you have to bear in mind if using with a gimbal. We had to add a counterweight when using it on our gimbal (Moondogs do sell counterweights, but we had a spare one lying around that we adapted).
Now, there is something else to bear in mind if you are considering purchasing a Moondog lens. If like us, you’re not based in America, you will have to pay for shipping and customs, which in our case almost doubled the cost of the lens!
We also decided to purchase a Gorillapod (a mini tripod that can wrap around objects such as edges of doors, fences etc) as these are such versatile tripods and they’re small, so very convenient to carry around. We opted for Joby and their most expensive model, costing £100. We were really impressed with it when trying it out, and used it on a couple of shoots (both with an iPhone and our Blackmagic Pocket Cinema camera) to get some interesting angles.

However, after a few weeks of using it, one of the legs broke clean off, in fact it broke in two places! Doing a bit of research, we found this seems to be a common problem with the Joby Gorillapods. We purchased ours from Amazon, and when we got in contact with them about the problem they did send out a replacement straight away, which was great, but, having read how common this problem is, we really wanted something we could rely on.
Costing £80 less, the Fotopro UFO2 is a little smaller and with a carry load maximum of 800 grams, can’t take the weight that the Gorillapod can, but for smartphone filming it’s more than up for the job. Another great thing about the Fotopro is that is comes with a ball-head attached, whereas you have to buy a ball-head attachment for the Joby Gorillapod (at an extra £50!) – unless you have a spare one lying around.
So, take a tip from us if you’re interested in getting one of these type of tripods for smartphone filmmaking or photography, and save yourself a lot of money and frustration, go for the Fotopro alternative.

Noisy footage is a common problem with smartphone cameras – that’s down to the fact of the tiny sensor on the camera and the fact that the ISO settings have to be really low. The ideal ISO settings, according to our research online is something like 22! Compare that to a camera like the Blackmagic Pocket Cinema Camera whose ISO setting sweet spot is 400, which means to get decent, clean footage from a smartphone camera, you’ll need a lot of light in order to keep the ISO down.
Luckily we have plenty of small, battery operated lights – if you don’t have any, we recommend getting a few. You can get pretty powerful, small lights at very affordable prices.
One of our favourite small lights is the Aputure AL-M9 Mini LED. Very small but surprisingly powerful. Due to its size this is a very versatile light to have in your kit.

We have since found a cheaper Aputure light alternative, but as we haven’t tried this, we can’t say how it compares to the Aputure version.
Another great portable light in our kit is the Yongnuo YN300 Air Pro LED Video Light that allows you to adjust its colour temperature, along with its brightness.
There are plenty of great, affordable small lights out there if you take a bit of time to do some research and we have recently come across another very interesting portable lighting solution. They’re called Litra Torches and they are incredibly small and incredibly bright at up to 800 lumen!
We’ve definitely got our eyes on these lights and will be acquiring some for sure, but, although they’re reasonably priced at just under $80 each, it looks as though we’ll have to be prepared to pay almost double with the costs of shipping and customs.
When it comes to audio – again there are plenty of options out there. We prefer to record audio using a separate, dedicated recorder and sync it to picture later in the editing stages.
But, if you want to go down the route of recording high quality audio directly from your phone, check out this video for some tips and suggestions.
Our final verdict on the iPhone:
The iPhone makes a valuable and versatile addition to our film-making kit. They do have their limitations, of course, but limitations often produce the greatest works of creativity, and the images we have captured really impressed and surprised us.
In fact, we have made the decision to use our iPhones alongside our Blackmagic and DSLR cameras on our current film project 7 DAYS, and when screening rough cuts of scenes where iPhones have been used, no one has yet been able to tell the difference between the shots. So, we have definitely become fans of “iPhoneography” and will be using them a lot more from here on.
We also decided to use the recent snow blizzard that threw the UK back into the middle of a fierce winter, as the perfect excuse to put our new lens and our iPhones really to the test.

2 thoughts on “iFILM-MAKER”
Comments are closed.